Friday 14 October 2016

Reverse Tunnels, SSH

SSH:

If you've ever used a terminal shell, the chances are you've heard of SSH. SSH is arguably one of the most useful protocols ever made, allowing you to get a terminal shell on a remote computer. Most everyday Linux distributions even come with this setup and ready to go.
Commonly if you're trying to get to a linux computer on your home network through the internet, you will need to tell your router to port forward port 22 to your computer IP address. Port 22 is the default port for SSH, unless you configured your SSH server otherwise. 

Port Forwarding:

To understand how reverse tunnels work, we are going to need a basic understanding of what ports are and how to make use of them. Ports are talked about in numerical form; we already know the port for the protocol SSH is port number 22. Having this standard is really useful. By default, nearly all computers that can connect through SSH would know to automatically use port 22, without you needing to enter port 22 every time. Let's look at a practical example of why port forwarding is important:

This is a basic representation of the scenario I explained earlier. The item in the middle is the router, where a rule has been set up to forward all data that use port 22 to a specified computer. This means when I connect the router from the internet using port 22, it gets passed through to the SSH server. 

Reverse tunnels:

Reverse tunnels are similar to the image above in the sense we will use a port, create a rule and then the data gets sent to somewhere using the rule we created. 

The basic explaining of an SSH reverse tunnel: 
It is used to tell an SSH server to connect to another SSH server
  1. We connect to an SSH server
  2. We tell this SSH sever a port to listen on 
  3. We then tell the SSH server where to talk to the second SSH server, when somebody talks to it on the port we specify

There are many reasons for using a reverse tunnel. In the hacking world, it is a great way to get past firewalls or plant devices on a network that you can get back into later. To understand why, let's see an example of a command that sets up a reverse SSH tunnel:

ssh -R     1234:localhost:22       username@sshserver.com

The breakdown of this command:
ssh -R ... we tell the computer we are going to use SSH, the '-R' tells the computer we are going to open a reverse tunnel

1234 ... this is the port we tell the first SSH server to listen on (the first ssh server is in blue)

localhost ... this is the second computer that we tell the first SSH server to connect to

22 ... this is the port that we tell the first ssh server to use when connecting the second ssh server

username@sshserver.com ... this is the first ssh server. To set everything up, we at least need to be able to log in to the first SSH server

Using this:

To use this, we need to connect to the first SSH server. Then we need to open another connection on the first SSH server, using the port we've just opened (1234). First we need to log into the first SSH server. We should do this by using:

ssh username@sshserver.com

Once we've signed in, this is where we tell the first SSH server to open another connection. To do this:

ssh localhost -p 1234 -l [username for the second ssh server]

Let's break this down again

ssh ... we are going to use SSH to open our second connection 

localhost -p ... we are going to open a second connection on the same computer we are working on, however, the -p says we are going to use a port other than 22

1234 ... the port we opened on the first SSH server. We are going to use it now. This means that the first SSH server is now going to start following the 'rule' we created

-l [username for the second ssh server] ... we need to specify that we are going to use a different username. This will be the username for the second computer. 

Seeing this happen: 

Now you know the theory behind it, we can see a practical demonstration:


Graphical representation of what's happening:


I hope this has helped you understand reverse tunnels. Got any suggestions or spotted a mistake, tell me below :) 

Saturday 24 September 2016

MSI Cubi: a perfect fit

The MSI Cubi:

I've had some runs with MSI tech, so I must admit, I was already sceptical when I got this off Amazon. While it's not unusual in this day and age for computers to be getting smaller, I just want to take a moment to appreciate how far we've come... 


Let's go back to the year 2000.

In 2000 I was a screaming todler and now I write articles, but I want to talk about some technological advances instead. 

Intel and AMD go over the 1Ghz barrier in the speed of their processors, something that nobody thought they'd achieve. Oh, and all put together it looked like this: 

I won't show you a picture of what I looked in 2000, but I assure you it looks prettier than this. 

This was THE RAGE. Something that ran an Intel Pentuim 3, 933Mhz. A speed that just blows minds.


The MSI Cubi: 

My particular configuration has a Celeron, with 2 whole processor cores clocked at 1.6Ghz. I know, it's 16 later and computing has advanced but this should be appreciated. Not only for how far we've come, but how far we can go too. Mine runs quite happily as a media server and I'm getting that all from something that fits in the palm of my hand. Of course this success can't be attributed to MSI in particular. 

Not only this, you can get the Cubi in several configurations that go all the way to a dual core i7 and that's the sort of processor you could start chucking things like photoshop at, or some light video editing. With them being 5th generation processor chips too, this particular box has advantages over others which only offer 4th generation chips. With the 5th generation, Intel is claiming up to a 50% graphics improvement.
It should also be noted that mine, with the Celeron, has a TDP of 6Watts. This machine sips power frugally and will keep the electric bill down. 

The hardware: 

Take a look at some of my previous reviews, you'll notice I don't really benchmark my technology. If you want a PC that can score the highest benchmark, whatever configuration you get, this isn't the one for you. This little box is never going to beat my MacBook Pro on benchmarks, but it does what I need it do and fantastically too. You're getting an opinion here basically. If you want some benchmarks search for them on Google, it's usually easier to compare them to a wider range of processors anyway.

Speaking of range, you will need to think about what configuration you want if you're gonna pick one of these up. MSI offers a whole range, so do some research first. If you're going for a low power - everyday computing - the i3 configuration is the best bang for your buck. 

MSI offer some configurations that are ready to go, but if you get a barebone model you will need :-

  • 204 Pin DDR3 RAM, either 1 or 2 sticks
  • Storage solution: Either a 2.5 inch laptop drive, or an Msata SSD. If you feel crazy, you can even have both. 
  • Some sort of Operating System, bear in mind MSI drivers are only officially supporting Windows, but this is fairly generic hardware and Linux should run fine. 
Installing all of the above is fairly easy using the provided instruction booklet. If you opt for a 2.5" drive you will need to use the extra baseplate provided that will attack to your 2.5" drive. You also need the connector that connects the 2.5" drive to the mainboard. [Seriously, read the instructions, it's easy as pie!] Just make sure when inserting your connector you've felt a firm click before proceeding to close up the bottom. 

The RAM is just a standard fit and clip system found on most systems. Line up the pins and spacer to make sure you're not putting the stick in the wrong way round and push

That's it, you're ready to install your operating system. 


My Configuration: 

- Intel Celeron N3050, Dual Core clocked at 1.6Ghz. Turboboost: 2.16Ghz
- 8GB DDR3 204pin 1600Mhz RAM
- Bluetooth 4.0
- b/g/n Wifi 
- 240GB Sandisk 2.5" SSD

Performance:

The processor: 
Like I mentioned before, performance is going to vary on what configuration you have. It's obvious that the big bottleneck here is that dual core Celeron processor. Once more, it clearly shows in the experience of using this machine. Running Windows 10, I could have one or two heavy webpages open in Chrome, but that's about it. This is more of a 'one thing at a time machine' and with the Celeron, don't expect that one thing to happen too quickly either. However, for what I use my Cubi for, this is fine and actually makes me appreciate some of my faster machines!

RAM:
While the 8GB in my model is perhaps a little overkill I just happened to have some DDR3 lying around and thought what the heck. If you go for the Celeron processor, 1 stick of 4GB is certainly sufficient. However, if you go for the i7 or i5 configuration, you might find it appreciates a bit more to play around with.

It's all about your requirement. If you're going to be doing high-end work then yes, shell out on some RAM, but again, 4GB is sufficient for everyday computing. If are trying to cut down costs, you could probably grab 2x2GB sticks for a reasonable price on Amazon etc. 

I/O and Ports:

I was happily surprised to see that MSI has not skimped on connectivity here. Inside, there's a Wireless Card combined with Bluetooth and the 2.5" drive connector. If you're not using the Msata, you might even be able to use it for something else too. If you've tried/have suggestions hit me up! 


On the outside, there's 3.5mm headphone jack (yes, Apple, people still do use them) and also 2 USB 3.0 ports on the front. Go round to the back, we see a full size HDMI, a 4k capable Mini Display port, VGA out,  2 more USB3.0 ports, Gigabit Ethernet and power in. I was happy to see so many usb ports, as well as the combination of Mini Display port with HDMI with VGA - it just seems to have all the bases covered whatever your requirement. For security, there's also a Kensington lock slot too. 

What cool things can I do with this? 

Google has plenty of opinions to offer here. As there are so many, I'll just stick with my own personal examples:


  • Plex Media Sever: which organised my media, makes it available across the network and also remotely. 
  • Remote Desktop Server: this is great if I need to get back into my home network and pick up a files. It's also great for gaining access to blocked websites and applications as most corporate networks don't block the outgoing 3389 port for RDP. 
  • Wake On Lan (WOL) machine for my internal network: if I need to fire up something that's off, I can eat a donut and turn a machine on from where I'm sitting without moving. 
  • HTPC: applications like Kodi are great for presenting a nice looking, but also very functional media player. The processor in this supports full 4K playback.  


The perfect fit: 

This little device has a lot to offer and is a fantastic example of just how far we've come in the computing world. Higher configurations should be able to play low end games (albeit on low settings) and offer very fluid computing experiences. It's super quiet and can easily be tucked away. It's actually pleasant to look at, but if you don't agree it also comes with a VESA mount to help you tidy it away behind a screen. On top of all this, most of the barbone configurations come at a great price too and you can keep costs down if you've already got some components lying around. 

Saturday 23 July 2016

The Dell XPS 15 review: is it worth it?

The ugly, the bad and the good?


I haven't posted in a while and saw it fitting to post a review of a laptop I recently had, seeing as I seem to cover a range of things tech on this blog. This post is a review of the Dell XPS 15 9550.

The specs seem to fit the need of the type of machine I needed, which was great news as you'll often find this level of spec in business laptops  (which are sometimes hard to obtain) and gaming laptops, (which is a bit overkill for my needs) so the spec sheet glows. A strong powerful i7 chip, with hyperthreading, 16GB of DDR4 RAM, ample storage space and of course that infinity edge display all paired with a promising battery life. 

That nearly 'besseless' display looks amazing and it's a pretty cool USP. 

Dell offers several variants of this laptop  my model included:

  • Intel core i7 6700HQ - 2.6Ghz base with turbo-boost to 3.5Ghz
  • 16GB DDR4 2133Mhz RAM
  • 84Wh battery - up to 17hrs (according to Dell)
  • 512GB Toshiba NVMe Solid state drive
  • Nvidia GTX 960m with 2GB GDDR5 RAM
However, does this all come at a bit too much of a cost? Let's just get some issues out of the way first. 

The ugly:

This machine has a lot going for it. It's good on paper, looks sleek and the battery life nearly lives up to a 15" MacBook pro. However, if you have a tad of OCD like me - there are some things that are seriously going to bother you and for a price point of £1000 plus, some of these issues aren't actually acceptable. I had did an RMA on my first machine, only for my second machine to have the same faults:

  • The speakers crackle when changing brightness, plugging in the laptop and often output frequency that cause the sound to resonate off the casing. The crackle is believed to be caused by Dell's Maxx Audio setup, but even after uninstalling software and drivers - it was still there
  • My first unit has black smears on the screen, only visible at some viewing angles and 100% brightness, but not satisfactory for the price. While the second machine was not as bad, but there were still slight defects on the screen. 
  • Putting the screen brightness below 25% causes pretty intense flickering of the screen. This is known to be an Intel issue, with their integrated graphic chips. Still, I'd rather have an older, less buggy chipset, then headaches while working at night
  • Sleep/Resume issue. Both my units struggled after Windows 10 put the laptop in a hibernated state. Most commonly I'd get this issue in the morning, after leaving my laptop closed for the night. Upon waking it, you spend about 15 seconds looking at a blank screen and the only indication the system is actually on is the power light. 
  • My second machine had a column of back-light keys that were always darker than the rest. Something small, but noticeable when working at night. 
So, I sent it back. this may sound like complaining, but this isn't something I want from a machine which is nearly at 15" base MacBook Pro pricing. It just seems like Dell have clumped a load of components into a shell and it all added up to a mediocre user exprience. 

The bad:

Every laptop has its floors. I know no system is perfect and I've had experience with quite a few. However, with that XPS label and the price [*I know, I mentioned it... AGAIN*] you should be able to expect close as you'll ever get to a perfect system.

But for me personally, you just. Don't. 


The battery indicator:

The right hand side I/O has a SD card slot, USB 3.0, Kensington Lock and a battery indicator. The battery indicator has 5 LED lights, each representing 20% of the battery. Now while this is cool, I just didn't use it and ultimately felt something else could have been put there. For example, it would have been great to see an extra USB Type C / Thunderbolt port instead. Even Apple did away with the battery indicator on their macbooks sometime ago. 

The hinge:

My configuration came with a 1080p screen and also the stiffest hinges in the world. While I appreciate it helps reduce screen wobble when typing, this was just too stiff. You lift the lid with one finger and actually requires effort to open. Silly, I know, but it's just an issue I have when I need to get at the laptop quickly

Ventilation:
I care about my temperatures. I care about mine to protect longevity of the components. Firstly, it being a Dell, there's no simple fan control. While this isn't a problem, it is linked to my second issue with ventilation.

The fans on this kick in when the CPU starts getting into the 60s - 70 degrees; reasonable.  However, when the fans kick in under load, the quad core i7 anywhere between the 50s and 60s .Using HWinfo, I was able to gain near enough manual control and ramp the fans up before they hit the tempreture threshold. As a result I got a few degrees lower core temp, then letting the BIOS cool the machine automatically. All of these temperatures are fine and respectable, but for a machine that's supposed to be able to handle high load, a manual fan control would be nice.

I also think temperatures might have been helped by better placed intakes. This thing only has one intake on the bottom, in the form of a long grill. It bothered me that I was always checking to make sure if they were covered when doing a bit of casual gaming in bed, as there is no side intake. 


USB connectivity:

While I'm sure that 2 USB type A ports would be enough for some people, I constantly found myself pondering on if I should invest in a dock. I like to keep a USB dongle for my wireless mouse permanently plugged in, meaning I was really only left with one USB port.  Either this means Bluetooth peripherals or a USB hub. Ugh, right?

GTX 960m 

The graphics is this are reasonable, but I have an issue with Dell placing this card in this system. It's not a bad card and it played and rendered most of what I chucked at it fine. Nothing wrong there then. However, we are living in a world of GTX 970m's and 980's and it would have been nice for either of those cards to make an appearance here. I feel like the 960m was a bit under-powered. The geeky part in my mind felt like it was taking away the whole 'premium product, premium specs'. 

The good:

Right.. that's it. Bad things out of the way. If you can't stomach the idea of the issues raised above, I wouldn't suggest reading further. However, if you are willing to make compromises, this machine has a lot to offer.

Battery life:
That huge 84Wh battery, combined with a 1080p display and a Skylake processor, which uses the new 14nm lithography adds up to about 8-9 hours on casual usage. For me that included: word processing, opening up a 3D model and working on it and some video watching. Although Dell's website says up to 17 hours, that figure does seem about as likely as Dwanye Johnson becoming obese. Yes, it's main competitor being a MacBook Pro, does squeeze a little more battery life, but will squeeze your money too.

A sort of niche market:

When I returned my first XPS, I loved it so much that I had to give it another go, mainly because there was nothing else to replace it with. This machine offers power with battery life, which is hard to come by. Asus offer similar specs in one of their machines, but the only option is 4k screen - which takes a huge hit on battery life. Other than the Asus, nothing really caught my eye as a replacement. Yes, something like an Aorus offers similar advantages, but is in a totally different price bracket.  Dell have done a good job at making it affordable and powerful, while retaining a good form factor.

Build quality and design: 


There is not an angle of this machine where it does not look beautiful. Whatever configuration you get, the infinity edge display and the thinness of the machine just catches you eye. The exterior is made from beautiful smooth aluminium, while the interior and the side of the machine is carbon fiber. Although a grease magnet, the carbon fiber looks stunning and is cool to the touch and I haven't seen any manufactures make carbon fiber look better then it does on this machine. If you opt for the 4k screen, you'll get a glossy finish and a matte on with the 1080p screen. If the design isn't enough for you, this machine felt pretty solid. In the short time I had it, I carried it around and it never once felt flimsy. I think that aluminium helped with that. I can see some inspiration from Apple here for the design, materials and build quality but Dell has put enough here to distinguish that it's not a MacBook.
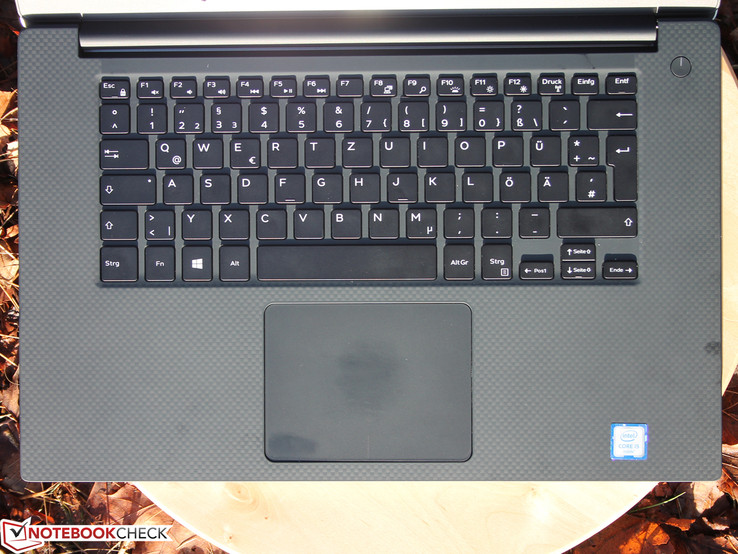
Touchpad: 

Hand down, this is the best Windows touch-pad I've ever used. It's responsive, registers taps and the palm detection is excellent. It's big and the glass finish means your fingers just glide over it with ease. The two finger scrolling is spot on and it comes with lots more gestures that you can change in Windows. If I had one complaint, I found the right click and left click buttons had a lot of travel and made a very loud 'thunk' when pressing them.

The keyboard: 


The keyboard is not the best laptop keyboard, but it's good enough for a mention. The layout matches the one we see in the 13" XPS. I love that the F can be locked on, allowing you to use the media buttons, without pressing the Fn key. I don't really have that much use for the normal function keys, except alt+F4 for closing an occasional window. The travel of the keys is a little shallow, but was responsive enough for me and the keys are a comfortable distance. I could type pretty fast while coding; all in all, a nice experience. 

A Pyrrhic laptop:

I loved this machine when I first unboxed it. It looked beautiful and had a lot of promise. If you've made it this far, then you know it's actually got some pretty good things going for it. Some of these good things (like the trackpad) you'll struggle to find elsewhere; all at a cost though.

Herein lies the problem: the bad outweighs the good. That's why I returned my second machine. A machine targeted at a high end market shouldn't have these demons and shouldn't be full of comprises for you to actually enjoy it.. As for the ugly, these machines should never have left the factory with the level of faultiness they have. Dell have let us down here.

What to get instead of a Dell XPS? Tough one and I honestly would have to say a base MacBook Pro 15" if it a no-compromise machine is your thing. 


Wednesday 13 July 2016

Switching from RAID to AHCI

Brief overview:

RAID, AHCI? What? Well, the average computer user need not worry and neither geeky people like me really. All I care about is that I have my computer configured correctly for whichever I need. RAID and AHCI are ways in which the computer access the storage. Most of the time, if you've only got 1 drive (whether is be and SSD, HDD, nvme PCI SSD) ... you're going to need ACHI. 

RAID is a way of turning lots of disks into one big disk by use of a RAID controller. This can be for data backup, increased performance and just ease. For some reason, whatever it is, most new computers today (including my 2 year old desktop) come with Intel Rapid Storage technology configured, which happens to use RAID. I'm not a fan on Intel Rapid Storage technology - I've had more problems with it, then it actually working fine. 

Switching from RAID to AHCI interchangeably. 

To do this, we need to get windows to recognise the change and to configure itself appropriately. The easiest way to do this, is to get windows to start up with the bare minimum, in safe mode. To do this...

1. Hit Start and search for "change advanced startup option":


2. Hit "restart now"


3. "Troubleshoot" 


4. "Advanced options"


5. "startup settings" 


6. FIDDLY BIT: 
On the next screen, hit restart now. Between the computer restarting again, you will need to get into your BIOS. Yours may look different to mine and it's your job to investigate where the setting is as there are so many motherboards! 

My machine is a Dell and my BIOS key on boot is F12

7. Change drive mode from RAID to AHCI

Mine setting is under System Configuration > Sata Operation. Select AHCI and then save and exit. 

8. Select option 4, 5 or 6


If you have reached this screen before changing the BIOS, you need to try the whole process again.

Now, the machine will boot. Log in to the machine for good measure and now restart. Change successful ;)

Monday 11 July 2016

Coke.exe

I haven't been on here in a while, but just thought I'd share a fun little bit of code I did.

Originally, I got the idea of tumblr, here:


So with a bit of searching around, I wrote a quick VBS script doing exactly the requirement above ;)

You can check it out here:

Google Drive link to coke.exe

If you're interested in the source code and the github repository, you can find it here:

https://github.com/best-geek/Coke.exe

Credits

Grabbed help from tutorialspoint.com

VBSedit: website (buy or use the free version)

This page on GameSpot

Wednesday 29 June 2016

How to use an older kernel

Using an older kernel

The kernel is a fundamental key to an operating system. The kernel is essentially the part between software and hardware; the software interacts with the hardware by use of the kernel. Lots of people go on without the need to worry about the kernel and if you can avoid messing with anything, please do. 

In my case, I needed to use an older kernel. If you keep you're keeping up with my blog, you should know that I've had some pretty major sound issues with my Dell Latitude E5440. Using an older kernel lead me to a fix. 


Side track (skip if you don't have a Dell Latitude with a sound problem):

If you do own a Dell Latitude series where the sound doesn't work after you've upgraded or have a sound card similar to mine, with sound problems then this might work for you. When I installed Ubuntu 12.04 LTS (Trusty Tahir) the sound worked absolutely fine and then it would stop after I upgraded to a Ubuntu version any higher than that. In an attempt to fix my problem after an upgrade, I exported my alsa audio configuration in the hope that after I'd upgraded my distribution, I could restore the configuration and everything would work fine. 

This was not the case. Upon attempting to restore my alsa configuration (after installing Ubuntu 16.04) I was chucked a hardware error. Thus leading me to the idea it could be the kernel causing a problem. Using an older kernel fixed the problem and now Ubuntu can interact with my sound hardware perfectly. 

What you'll need

  • Either an upgraded machine with an older kernel you knew worked or the kernel installed, which you can grab from here
  • Another machine with this guide displayed, the machine you use the older kernel on you need to reboot at some stage
  • Basic Linux knowledge. 

Getting the machine to boot with an older kernel:

  1. If you're not on an upgraded machine, which has used an older kernel then install one from the link to the archives (above) 
  2. Turn your machine off
  3. Turn it on and get to the Grub boot menu ... you may need to press shift as you boot to get the menu to pause long enough to see the options
  4. You will need to take note of every option you select now
  5. Select Advanced Options. For me, it is: "Advanced options for Ubuntu"
  6. Then take note of the kernel or other option you choose. For me, I take pictures like the one below. 
  7. Hit enter on the kernel you want, just to check everything works fine. If it does, then continue this guide, if it doesn't you might want to try another one. I've had quite a few on my machine


Getting the machine to boot with an older kernel automatically

Now we've tested an older kernel and checked everything works, we can construct the change we will make to grub, so it does this every time the machine boots. To do this, we need to tell grub the options we selected to boot the older kernel. In my case:

"Advanced options for Ubuntu>Ubuntu, with Linux 3.13.0-91-generic"

The > indicates the next option we selected after Advanced options for Ubuntu. 

Take note this is case sensitive and the quotation marks are needed. 

Now all we need to do it edit our grub configuration with this option. In my case you can see I'm using the Linux 3.13.0-91 kernel. 

Now, we need to run this commands:

sudo nano /etc/default/grub

Now, change the grub default  option. Eg, mine is:
GRUB_DEFAULT="Advanced options for Ubuntu>Ubuntu, with Linux 3.13.0-91-generic"

Hit cntrl&x to close the file. 
Hit the 'y' key
Hit the return key to save the changes

If you did not use the sudo command, you will get an error: permission denied. 

Now, update grub with

sudo update-grub

That's it. After you run the last command you should see a quick flicker of text as it saves the settings. 

How to test for success:

If you reboot your machine and get to the grub menu again, you should see the options you wanted are highlighted automatically and all you need to do is hit enter. To see the kernel you're running, you can type 

uname-a 

in a terminal to get an output similar to this:

Linux Bella 3.13.0-91-generic #138-Ubuntu SMP Fri Jun 24 17:00:34 UTC 2016 x86_64 x86_64 x86_64 GNU/Linux